Friday, February 6, 2015

How to correlate a value with dynamic boundaries in VuGen

If you are checking this post, seems the left and right boundaries are killing your time. Lets check how to deals with those dynamic boundaries using the text flags of VuGen.


You can use one of the following flags after the text, preceded by a forward slash:
/IC to ignore the case.
/DIG to interpret the pound sign (#) as a wildcard for a single digit.
/ALNUM to interpret the caret sign (^) as a wildcard for a single US-ASCII alphanumeric character. There are three syntaxes: ALNUMIC to ignore case, ALNUMLC to match only lower case, and ALNUMUC to match only upper case.

eg: email\u003d\"notification+mkuw__3d@facebookmail.com
In the above server response if you have to capture the highlighted part(in RED), the left and right boundaries have some alphanumeric chars and if they are dynamic then you have to follow the below approach.

web_reg_save_param("account_notify",
        "LB/DIG=email\u00#d\\"",
        "RB/DIG=__#d@facebookmail.com",
        "Ord=1",
        "Search=Body",
        LAST);

and for instance lets say that "u003d" in the left boundary itself is dynamic, then below will be our approach.

web_reg_save_param("account_notify",
        "LB/ALNUMIC=email\^^^^^\\"",
        "RB/DIG=__#d@facebookmail.com",
        "Ord=1",
        "Search=Body",
        LAST);

ALNUMIC means the boundary is an alphanumeric and IC asks it to ignore the case(upper or lower)

Friday, January 23, 2015

How to calculate doc download time in LoadRunner

Lets says that we have a document in one of the pages that we record in VuGen and we have to capture the time it takes to download only that file, then Use the below steps after the step which downloads the file.
Note that the RecContentType=application/pdf for the step

web_url("BCAction.do",
        "URL={url}//BCAction.do?choice=display&ctno=1234567890",
        "Resource=1",
        "RecContentType=application/pdf",
        "Referer=",
        "Snapshot=t24.inf",
        LAST);

 time = web_get_int_property(HTTP_INFO_DOWNLOAD_TIME);        
 lr_output_message("The time in ms to download CSS PDF is: %d",time);


Some more information about Web_get_int_property
The web_get_int_property function returns specific information about the previous HTTP request.
The meaning of the return value depends on the HttpInfoType argument. HttpInfoType can be any of the following options. The first constant in each pair (HTTP_*) is for C, the second (object.HTTP_*) is for object oriented languages(Java scripts).

HTTP_INFO_RETURN_CODE or object.HTTP_INFO_RETURN_CODE
The return code in HTTP response header.

HTTP_INFO_DOWNLOAD_SIZE or object.HTTP_INFO_DOWNLOAD_SIZE
The size (in bytes) of the last download, including the header, body, and communications overhead (for example, NTLM negotiation).

HTTP_INFO_DOWNLOAD_TIME or object.HTTP_INFO_DOWNLOAD_TIME
The time in (milliseconds) of the last download.

HTTP_INFO_TOTAL_REQUEST_STAT or object.HTTP_INFO_TOTAL_REQUEST_STAT
Returns the accumulated size of all headers and bodies since the first time web_get_int_property was issued with HTTP_INFO_TOTAL_REQUEST_STAT.

HTTP_INFO_TOTAL_RESPONSE_STAT or object.HTTP_INFO_TOTAL_RESPONSE_STAT
Returns the accumulated size, including header and body, of all responses since the first time web_get_int_property was issued with HTTP_INFO_TOTAL_RESPONSE_STAT

This function is supported for all Web scripts, and for WAP scripts running in HTTP mode only. It is not supported for WAP scripts running in Wireless Session Protocol (WSP) replay mode

Friday, October 17, 2014

Using continue on error in VuGen

In the run time settings we see the option "Continue on Error" which is used when you want to continue executing the script even after encountering a failure/error.

In some cases you dont want to use Continue on Error option in Run time settings but want to use that for a specific part of the script, below steps can help you to do that.

In the below example, you want to capture a dynamic value and at that same time that dynamic value can appear intermittently. It comes for 1 iteration but not the other, so i have used "Notfound=Warning", and because script fails if value is not found I have placed lr_continue_on_error at the start and end of that step.

// Set Continue On Error
    lr_continue_on_error(1);

// Save the error message if any
    web_reg_save_param("error_message",
        "LB=Message0 >> ",
        "RB=\r\n",              
        "Search=Body",
        "IgnoreRedirections=Yes",
        "Notfound=Warning",
        LAST);

    Web_url("name",
               "..........",
               LAST);

// Turn off Continue On Error
    lr_continue_on_error(0);

Saturday, August 9, 2014

How to use JavaScript in your HP LoadRunner scripts

This post was written by Boris Kozorovitzky, from the HP LoadRunner R&D team.

JavaScript is rapidly becoming the driving force behind the Internet. Any website, small or large, has some parts written with JavaScript to enhance the user experience. Browser vendors constantly improve the speed in which JavaScript is parsed and executed in their browsers. This increase in speed is now to the point that it’s become one of the key benchmarks for every browser version. When we performance test a website, a web application, or even a REST service we can be sure that JavaScript plays some role in the business process we are about to test.

HP LoadRunner uses C as the native language for scripting HTTP/HTML scripts, but it allows integration and use of JavaScript code with relative ease. To learn more about this integration, consult Using the LoadRunner JavaScript Enginechapter in the HP LoadRunner User Guide. 


Why would we want to use JavaScript in our script?
There are four main reasons:
  • JavaScript often offers a more intuitive experience which is easier to implement than in C.
  • The JavaScript regular expression library simplifies the challenge of working with regular expressions.
  • Numerous JavaScript libraries that assist with any coding task (e.g. string manipulation) are available.
  • Client-side logic is often implemented in JavaScript. Inserting snippets of the original JavaScript code means you don’t have to translate the JavaScript client logic into C code.
This article explores the following scenario: We are testing a web server application which is used for authentication. Our goal is to receive an authentication token from the server and use the token in all future communication with the server. The authentication process is as follows:
  1. Send an HTTP GET request to the “/challenge” REST API to get a challenge string.
  2. Perform some calculation on that string and generate a unique password using a proprietary encryption algorithm.
  3. Send a GET request to the “/token” REST API passing the password generated in step 2 as a query parameter.
(If you are unfamiliar with some of the terms in this process you should read my my previous post about Load testing of a REST API, using HP LoadRunner’s web_custom_request).

For this scenario we run a simple web server which serves static values (using Node.js). The server code is available as an attachment to this article (web_js_example_server.zip).

Getting the challenge string
Our first goal is to obtain the challenge string from the server. We type the following step into our script to make the required REST API call:

    web_custom_request("challenge",
        "URL=http://localhost:3000/challenge",
        "Method=GET",
        "RecContentType=application/json",
          LAST);

We want to capture the server response in a parameter. To this end, we add a web_reg_save_param step before our request and save the response body into a parameter named “challenge”:

    web_reg_save_param("challenge","LB=","RB=","Search=Body",LAST);

Calculating the password                                                                                               
Now that we have the challenge string we can use some JavaScript manipulations to generate the password.
First we need to enable JavaScript for our script. To do this, open the Run-Time Settings (F4) and go to Internet Protocol > Preferences > Set advanced options.  Click on Options…, and in the dialog that opens (scroll all the way down), set Enable running JavaScript code to Yes (as in the screenshot below) and then click OK on both dialogs.

p1.jpg

Next we need to create a new JavaScript file that contains our code. Right-click the Extra Files node in the Solution Explorer and select Create new file… Name the new file calcPassword.js and press OK.
We know that the string returned by the server is a JSON object which contains an array with some strings. The last member of that array is a number which tells us the index of the string we want to extract from the array and encrypt using the proprietary algorithm. We add a new JavaScript function that extracts the value from the array:

function getPassword(stringData){
    var data = JSON.parse(stringData);
    var index = data[data.length - 1];
    var value = data[index];
}

The required value is stored in the “value” variable, and now we have to apply the encryption function. Luckily for us, the server code is written in JavaScript since it runs on Node.js and it already has a module called crypto.js which implements the proprietary cryptographic algorithm. Import the crypto.js file into the script by right-clicking the Extra Files node in theSolution Explorer and selecting the Add files to script… option. Select the file crypto.js from our server folder (you would typically ask for this file from the R&D team). Edit the file so that it contains only the function we need (this step is not mandatory and is performed for clarity, we could use the original file):

   function encrypt(data) {
    return data.toString().split("").reverse().join("");
  }

(I don’t recommend using this function as a real life encryption method as it only reverses the input string J)
Now we can update our getPassword function to call the encrypt function:

function getPassword(stringData){
    var data = JSON.parse(stringData);
    var index = data[data.length - 1];
    var value = data[index];
    return encrypt(value);}

Now we just add the web_js_run step to run our JavaScript code:

    web_js_run(
        "Code=getPassword(LR.getParam('challenge'));",
        "ResultParam=password",
        SOURCES,
        "File=crypto.js"ENDITEM,
        "File=calcPassword.js"ENDITEM,
        LAST);

The parameters are straightforward but you can always consult the product documentation if you are not sure. In this case we call the getPassword function defined in the JavaScript file. We want to pass it the parameter we got from the REST API call. We use the LR.getParam utility function (implemented in JavaScript) to pass that parameter as string to thegetPassword function. The result of the function is stored in the parameter defined by the ResultParam argument (“password” in our case). Finally we have the source files that contain our JavaScript code added as “File=…” arguments separated by the ENDITEM constant.

Obtaining the token
Our final step is obtaining the token from the server. We could just use the password parameter to create the URI, but that would be a mistake because we need to encode the URI first. We can do it easily using another web_js_run call (since JavaScript natively supports URI encoding). This time the call is quite simple:

    web_js_run(
        "Code='http:/'+'/localhost:3000/token?password=+ encodeURI(LR.getParam('password'));",
        "ResultParam=uri",
        LAST);

(Note that we split up the ‘//’ string in the ‘Code’ parameters into two separate sub-strings.  If we were to pass it in as a single string “//”, LoadRunner would report error -26312, “Using "//" line comments in argument of type 'code' is illegal/unsupported”)

Now we add the step that makes the final call with the calculated URI to the appropriate REST API:

        web_custom_request("get token",
        "URL={uri}",
        "Method=GET",
        "RecContentType=application/json"
        LAST);

The result from the server is as expected:

Action.c(25): t=1987ms: 38-byte response body for "http://localhost:3000/token?password=damhA" (RelFrameId=1, Internal ID=4)
Action.c(25):     "4f6dfbce-412f-4c6c-8bac-7d7d66a6b822"

Conclusion
Enhancing your HTTP/HTML script with JavaScript code is easy and useful. There are numerous scenarios where this capability can be employed to shorten scripting time and create a much more robust script. The HP LoadRunner User Guide is key to understanding the full potential of this feature as it includes a built in function library that links the JavaScript code to your test script’s code.

Wednesday, September 12, 2012

HP LoadRunner 11.5 features

                                   On June 5th 2012, HP launched HP ITPS Applications software version 11.5. This 11.5 set of releases focuses on HP Application Lifecycle Management (ALM), HP Performance Center (PC) , HP LoadRunner and HP Sprinter, as well as the new HP lab management automation feature which is supported in both HP ALM 11.5 and HP PC 11.5.(These solutions are available from June 30th, 2012.)

Virtual User Generator (VUGen): a new interface that brings insight

HP LoadRunner 11.50 introduces an innovative VUGen (Virtual User Generator) interface with redesigned IDE and Design Studio. It is now easier than ever to record, replay, and debug scripts using the new VUGen. The improvements include:
•Usability
− It has a modern and intuitive look and feel, flexible panes, and layouts.
− The improved editor is now context-sensitive, supports code completion, and provides enhanced coloring and formatting. It also supports editing features such as highlighting, intelli-type,
watchlist, copy/paste, color coding, etc.
− A true C language debugger has been added.
− The Solution Explorer makes it easier to group multiple scripts, access script items, and perform script-related operations (e.g. comparison). 
− New capabilities are added to search and replace in log and snapshots.
− Step Navigator replaces tree view for single view of the script with easy filtering and search.
− A persistent framework helps maintain a custom look and feel for the script developer.
− Context sensitive help provides needed assistance for the application element that is being used at the time, at the touch of a button (F1).
• New Correlation Studio
The new Correlation Studio hosts all correlation functionality in one place: record-based correlations, replay-based correlations, correlation rules, and correlation from snapshot. Correlations can now be found based on server responses during recording, in many cases eliminating the need to replay iteratively to find dynamic values. It also includes new APIs for locating parameters based on XPath and Regular Expressions. The new Correlation Studio interface and new APIs make scripting easier, faster, and more intuitive.
• Data format extension (DFE) for GoogleWeb Toolkit (GWT) 
The DFE feature is designed to simplify scripting of applications that exchange formatted data; by turning the formatted data into a more readable format the script can be easily correlated and parameterized. GWT DFE is the latest addition to the already supported formats of Base64, JSON, URL Encoding, XML, and Prefix-Postfix. GWT support includes:
− Formatting the GWT RPC data into readable and correlate-able content
− Adding more data (i.e. object field names)
− Enabling simple parameterization
− Solving specific correlations for GWT
• Extensibility
New in version 11.50, users can extend on the functionality of the all-new VUGen IDE itself by developing add-ins that are integrated into the user interface.
• Collaboration
Community sharing allows integration into the HP online community and helps the script developer to be more efficient and productive. Easily access forums, blogs, and Twitter, or add your own search engine to enable access directly from within the development environment.
• Recording 64-bit applications
Support for recording 64-bit applications has been added to the existing support for 64-bit operating systems. These 64-bit applications can usually be recognized when the “*32” suffix is not displayed in the Windows Task Manager for their process (replay is 32-bit based).
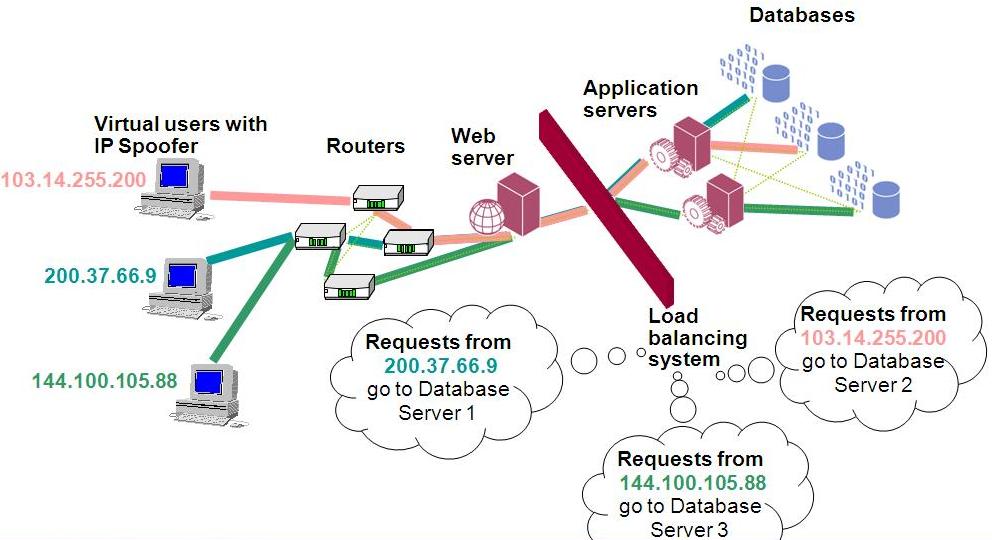
IPv6 support
IPv6-based applications can be tested in addition to applications based on IPv4. Support includes IP Spoofing.  Note: internal PC/LR communication (e.g. Controller-Load Generator) is still IPv4 based.

Seven new protocols

• Mobile protocols
New protocols have been added to enable developing scripts for mobile applications. The Mobile Apps protocol (in Web bundle) is used for native applications and Mobile TruClient (RIA bundle) is used for browser-based mobile applications.
• Ajax TruClient for Internet Explorer (IE 9)
This new addition to the Ajax TruClient family expands support to Internet Explorer (IE)-based applications. Applications that work in IE standard mode can be quickly scripted utilizing the same
TruClient technology that has revolutionized scripting for Firefox Web applications.
• Enhancements on TruClient for Firefox
The modern Ajax TruClient Firefox protocol was moved to Firefox 8 providing better performance.  It now supports HTML5 and allows creating functions to easily reuse and share code. Also added were “Think Time” recording, global event handlers to support asynchronous behavior, an API for URL filtering (black and white list), an API for setting HTTP headers, and the ability for automatic transactions per step.
• Web protocol asynchronous support
Support for asynchronous behavior has been added to Web (HTTP/HTML) VUser scripts, and Web-based functions inside Flex, silverlight, and Web Services VUser scripts. This new capability enables recording of poll, long poll, and push interactions required for advanced Web applications that contain various asynchronous communication designed to keep the information current and up to date. These unique communication patterns are recognized automatically and the recorded script is updated accordingly.
• Web Services enhancements
The Web Services protocol includes new features for better security support, improved handling of WCF (Windows Communication Foundation). The Web Services protocol includes the following enhancements: improved UI for security settings including addressing versions, easier certificate selection, flexible definition of signature and encryption algorithms, the option to exclude timestamps, and support of custom extensions to WCF.
• Flex enhancements
New capabilities have been added to better support Flex environment. These new capabilities include:
− Web correlation mechanisms (rules, studio, and response-based correlation, Web correlation APIs)
− Web requests support
− Adobe Flex platform jars bundled in the product so application jars are not needed for message serialization
− RTMP FMS streaming, RTMPT and RTMPS, and GraniteDS support
• .NET4 support
With this release, .NET4 support has been added to the existing support for .NET frameworks 2-3.5.

Extensibility for greater functionality

HP LoadRunner provides best-of-breed extensibility by allowing engineers to include custom code in their scripts and increase their functionality, or use different languages such as JavaScript,Java and VBScript to write custom scripts. Customers can also leverage Microsoft Visual Studio to edit their scripts and take 
advantage of its advanced IDE. HP LoadRunner also provides APIs for integrating load testing into your build management or other automated system. New in version 11.50, users can even extend on the functionality of the all-new HP VUGen IDE itself by developing add-ins that is integrated into the user interface.

 Analysis enhancements

A set of enhancements were added in the analysis, such as:
• New RTMP (real time messaging protocol) Flex Graphics
• TruClient breakdown graphs
• Ability to apply granularity to many graphs
• Global option of absolute/relative time on graphs
Integration with Service Virtualization
HP Service Virtualization helps “virtualize” components, and hence helps remove dependencies. Integrate with HP Service Virtualization and use simulated services to facilitate load testing business
processes that contain services that are not readily available or too costly.
VUGen for HP Business Process Monitoring
For customers that leverage scripts from VUGen to HP Business Service Management (BSM), it is required to record HP Business Process Monitoring (BPM) scripts using VUGen. The following
enhancements were added on Business Process Monitoring:
• Scripts parameterization
Support script parameterization from within BSM script repository to reduce script maintenance overhead.
• Easy script upload
Multiple scripts can now be uploaded into an existing folder in the script repository using drag-and-drop functionality.
A new set of supported environments
• Microsoft Windows Server 2008 R2 SP1
• Windows 7 SP1 (32 and 64 bit)
• Internet Explorer 9

Driving the DevOps trend: HP Lab Management

A challenge that performance testing teams often face is setting up a lab to run the tests. Often times, they are dependent on other teams to set up the lab. There may be stringent process and time requirements that may not be feasible. Infrastructure may not be ready when the build is ready. And build readiness is often unpredictable. These dependencies could become a roadblock, especially when they need to run tests on short notice in an Agile world. Also, if the lab is not set up correctly, this can lead to issues.
HP Lab Management allows testing teams to provision and deploy a test lab themselves in a hybrid delivery environment (bare-metal or virtual, in-house or in the cloud), through HP Performance Center. Leveraging an out-of-the-box integration with HP Continuous Delivery Automation (CDA), users are able to define the infrastructure topology, application configuration, and associated components (middleware, databases, etc.), and then deploy with the appropriate application build as needed. This model-driven approach helps eliminate user errors in lab configuration, thereby making the testing efforts more relevant and accurate.
Testing teams can also schedule tests along with the lab deployment, so that the execution can be kicked off when a new build is ready to be tested. Because the test environment can be provisioned and torn down dynamically, and not left idle, utilization of test infrastructure can also be dramatically improved through HP Lab Management.
HP Lab Management helps bring dev, test, and ops teams closer in a DevOps trend, since the same model can be used across the application lifecycle, whether in dev, test, staging, or production.

Bridging the gap between Development and Operations

HP’s long-standing ability to bridge the gap between performance testing and production performance monitoring has further been enhanced in this release. HP Performance Center now can incorporate actual production performance profiles and data in order to better replicate application behavior when testing.  
Information regarding production usage can now be directly imported from HP Business Service Management (BSM), or from third-party solutions such as Webtrends, to HP Performance Center.
HP Performance Center gives the performance testing team insight into how an application actually is used in production and how it actually performs. This helps create better testing scenarios that reflect real production usage. Based on this insight, they are able to plan and execute performance tests that are more accurate and realistic representations of application performance.
Similarly, HP SiteScope monitoring metrics and configuration can be imported to accelerate setup in testing environment.


Source - Hp.com 
*For more information - Data sheets and white papers: hp.com/go/performancevalidation & hp.com/go/loadrunner
**For HP LoadRunner 11.50 and HP Performance Center 11.50 Tutorials (Technical videos) - http://h30499.www3.hp.com/t5/HP-LoadRunner-and-Performance/HP-LoadRunner-11-50-and-HP-Performance-Center-11-50-Tutorials/ba-p/5687253#.UFIEpbJlSrs

Saturday, July 7, 2012

IP Spoofing in Performance Testing

Do I need IP spoofing? - Yes, if your system uses IP-dependent load balancing

Scenario without IP Spoofing 


                                    The above picture shows how the System Under Test (SUT) is being loaded if we test the application without IP Spoofing. Reason being that all the network elements and the servers have cache and they consider clients IP as the means to route the requests to different tiers, so if we don't have IP Spoofing a LoadGenerator can have only 1 IP and so the path traced by 1 Vuser and the other is the same as seen above as Routers and the Load Balancers will treat that the same user is coming with  a new request.

                                           Scenario with IP Spoofing 


      Performance testing targets are only met if we do the testing the same way as the system is loaded in the real time (same way as shown in the above snapshot) . Every performance test should aim at loading the SUT as shown above and thus highlight the genuine performance bottlenecks.
How do I implement IP spoofing?
1. Run the IP Wizard on each Vuser host machine (Load Generator)
2. Enable the IP Spoofer from the Controller's main menu.

Saturday, June 23, 2012

Rendezvous in LoadRunner

                          You all know the purpose of doing performance testing, but we have some features available with LoadRunner like Rendezvous and IP Spoofing which takes us more close to a real world situations and thus makes our test more valid than ever.
                          In the current topic we shall discuss about how Rendezvous helps us in improving and taking us close to those real world conditions. Lets take an instance of a shopping website which obviously includes some 3rd party sites during checkout eg: Paypal or Google checkout or Credit/Debit card payment etc. During the festival season we expect huge requests from the customers where the site might experience the problems and more importantly issues during the checkout which is major drawback for the shopping site as it decreases its revenue and the customer confidence.
                          So our next step would be to replicate the real world situation for the checkout functionality and to do that, LoadRunner has provided a function called lr_rendezvous() which can do the job for us


In the following example taken from LoadRunner tool doc's, the lr_rendezvous function sets the Meeting rendezvous point. When all users that belong to the Meeting rendezvous arrive at the rendezvous point, they perform do_transaction simultaneously. 

lr_rendezvous("Meeting");
    do_transaction();
/* application dependent transaction */  

                        The lr_rendezvous function creates a rendezvous point in a Vuser script. When this statement is executed, the Vuser program stops and waits for permission from LoadRunner to continue.
This mean that when we are doing the Load test every Vuser will be at different transaction (Vuser 1 is at 3rd transaction and Vuser 2 at 5th transaction etc) and to test business critical transactions (say 6th transaction) then we have to place Rendezvous after 5th transactions so that Vusers wait for all others Vusers to come to that complete 5th transaction and start 6th transaction simultaneously. Thus we can bring out the bottlenecks of that business transaction and could less the performance issues in the production environment. 

Note:- This function can only be used in action section, and not in vuser_init or vuser_end